The original First Edition owed special thanks to Jakub Tivianne for insightful feedback and discussion, Thehin Zamayid for his comments, the FL33T and BSB discords, and everyone who motivated Furl0w to finish the guide. Faye Vaelent designed and edited that print edition.
"This is badass"
"It's a great guide, good work"
Minmatar Fleet Alliance Thinkspeak Editions Sosala, The Bleak Lands First Edition · YC 126 Web Edition · YC 128
History
YC 126
First Edition
Furl0w publishes the original guide: fits, matchup notes, and solo plex tactics for faction warfare navy destroyers.
Adapted for my.minmatar.org with searchable fits, matchup charts, and live [NVY] fittings in the Fleet library.
Introduction
After Uprising, faction warfare shifted from frigates to destroyers. Destroyers can run every plex size except Scout, which made them the warzone’s best ISK printer and the ship class everyone else had to answer. Navy destroyers raised the stakes further: more EHP, better projection, and more damage than T1 hulls, at the cost of tracking and price.
Two years on, they are still the default tool for FW pilots and the most common ship on d-scan when you are plexing or hunting a fight. Furl0w’s First Edition (YC 126) covers the fits and 1v1 matchups below.
What follows covers the archetypes you will actually see in space, their 1v1 matchups with and without plex high ground, and practical notes on when to commit, when to bail, and where a fit can be upgraded without losing its identity.
Some considerations of the Metagame
The navy destroyer metagame looks different from the frigate metagame described in the frigate yearbook. Scram-kiting matters less: most destroyers, even blaster hulls, can scram-kite when they want to, thanks to the hull’s built-in projection bonus. What you get instead is closer to a binary chart: kiters with high ground beat brawlers, and brawlers with high ground beat kiters.
Destroyers also run several equally viable archetypes. You cannot read a Comet and know the fit; with a destroyer on d-scan you often cannot tell kite from brawl at all. You lean on local knowledge, scouting, and sometimes assuming the worst before you slide.
One surprise for frigate pilots: most brawling fits here use a 5MN microwarpdrive, not an afterburner. That trades some range control against other AB brawlers for advantages that tend to win out in FW:
AB destroyers are slow, and destroyer lock speed is slower than frigate lock speed. A microwarpdrive helps you catch kiters sliding into a plex.
The same speed lets you reposition inside a plex when someone appears on d-scan while you are killing the NPC 10 km off the beacon.
Overpropped 10MN destroyers are real. Against a 10MN + point fit, running a microwarpdrive keeps you in the range-control fight.
Post-Uprising FW is group-heavy, and group play expects a microwarpdrive. You do not want to be 60 km behind the fight because you fitted an AB.
The more brawlers fit a microwarpdrive, the less you are punished for fitting one yourself. That becomes a self-reinforcing loop.
Disclaimers
This guide is written for soloing. Many of these fits are wrong for structured gang work; there are better options when you are flying with others. The example fits are not meant to be the final word. Module tier, rig choice, and bling all matter, but each one is a solid representation of its archetype and will perform as described.
Matchup notes describe the optimal line when nothing else is in play. If you know your opponent’s fit, if you have fought the same pilot twice in a row, or if local conditions differ, change the plan. Being predictable is sometimes worse than being slightly suboptimal.
Summary of the Metagame
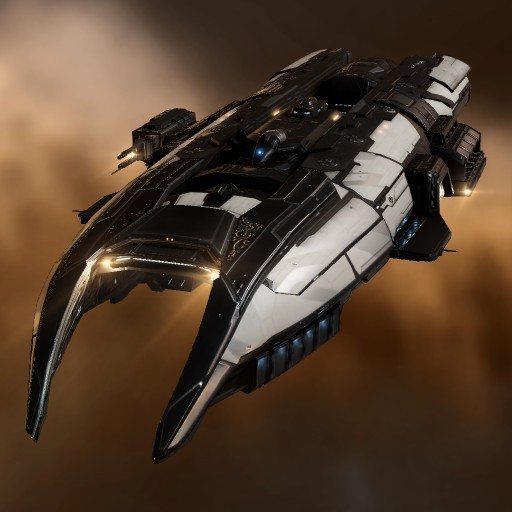
Catalyst Navy Issue
The most flexible and widely favoured destroyer in both warzones. Its two main lines (blaster brawl and 10MN rail) cover each other’s weaknesses: you do not want to be on top of the blaster fit, but you do want to hug the kiter, so even with high ground the defender faces awkward choices. Probably the best slide-in hull in the class.
Coercer Navy Issue
The scariest destroyer to punch into. Kiting variants (beam or locus pulse) deliver unmatched point-range DPS; brawling variants bring enormous EHP and frightening neuts. Slow speed and only two mid slots make it a miserable hunter, but a brutal ambush ship.
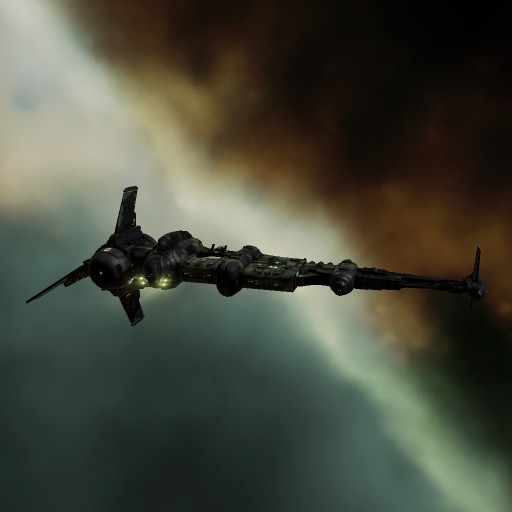
Thrasher Fleet Issue
Weak on paper in many 1v1 charts, still a fan favourite. Speed lets clever pilots disengage losing fights and commit only when the kill is there. Strong punching down (280 mm alpha deleting SAAR frigates) and up (MWD sig-bloom reduction for manual piloting).
Cormorant Navy Issue
A one-trick pony (slow, awkward active-tank bonus) that stat-checks most other destroyers at brawl range. Alternative fits exist but usually need more bling to justify the hull over a Catalyst.
Matchup Charts
++ Go for it champVery favorable matchup
+ Try it, you might like itFavorable matchup
= Fifty-FiftyEven matchup
- Bad IdeaUnfavorable matchup
-- Are you ok bud?Very unfavorable matchup
Brawling Matchup Chart
High ground→Low ground
High ground vs Low ground
Catalyst Blaster
Catalyst 10mn
Coercer Dual Neut
Coercer Brawl
Cormorant MASB
Cormorant Buffer
Thrasher AC No Web
Thrasher AC Web
Catalyst Blaster
=
+
--
++
-
++
++
++
Catalyst 10mn
+
=
++
=
++
++
++
++
Coercer Dual Neut
++
--
=
++
++
++
--
--
Coercer Brawl
--
=
--
=
=
=
+
=
Cormorant MASB
+
-
--
++
=
+
++
++
Cormorant Buffer
=
+
--
++
-
=
++
++
Thrasher AC No Web
-
--
++
-
--
--
=
++
Thrasher AC Web
=
+
++
=
-
-
--
=
Kiting Matchup Chart
High ground→Low ground
High ground vs Low ground
Catalyst 10mn
Beam Coercer
Pulse Coercer
Cormorant 10mn
Thrasher 5mn
Thrasher 1mn dual web
Catalyst 10mn
=
-
-
-
+
-
Beam Coercer
++
=
+
++
+
+
Pulse Coercer
+
-
=
++
+
+
Cormorant 10mn
+
+
+
=
+
=
Thrasher 5mn
-
-
-
-
=
-
Thrasher 1mn dual web
+
=
=
=
++
=
Gallente Destroyer · CatNI
Catalyst Navy Issue
The warzone’s most flexible destroyer: blaster brawler and 10MN rail kiter in one hull.
Ship bonuses (per skill level)
10%Small Hybrid Turret damage
7.5%Armor Repairer amount
15% reductionArmor Plate mass penalty
Role bonus
50% bonus to Small Hybrid Turret optimal range and falloff
Overview
High raw DPS, strong bulkhead-rig synergy, and two archetypes that cover each other’s weaknesses. The brawler plays like a Federation Navy Comet with a better slot layout: double web and scram for range control. The kiter is an overpropped 10MN rail platform that stat-checks many matchups if you accept slower plexing.
Blaster brawl
Plate vs SAAR is the main fork. Plate brings buffer EHP but loses to cap warfare; SAAR plus nos is faster and more flexible but thinner. Reasonable upgrades: plate + SAAR with cap inject and small neut, fewer bulkheads for more damage, or Ion blasters.
Up close the blaster CatNI wins most scram fights: if you land scram and web on entry. It loses to anything that can kite or scram-kite you (AC Thrasher is the classic example).
10MN rail kiter
Overprop lets you slide safely against scrams. You will not outrun everything, but you win many matchups outright: best for pilots who care more about kills than plex efficiency.
Web-kite at 10-15 km and watch capacitor. Meta 150 mm gauss for range; T2 125 mm rails for tracking and damage. Snake and Genos implants pay for themselves here.
Example fits
Live [NVY] fittings from the First Edition. Copy or open in the fitting library.
[NVY]
plate-web-scram
Versatile blaster brawler with armor plate, web, and scram. High buffer EHP wins most close-range destroyer scram fights; very weak to anything that can kite.
Active armor blaster brawler using a SAAR and nosferatu for sustain. More flexible than the plate variant but with a thinner buffer; still beats most destroyers you can land scram and web on.
10MN afterburner rail kiter with 150mm gauss guns. Slippery scram-kite fit that controls range against other destroyers; over-propped, so turn on prey early and avoid slingshots.
Faster 10MN rail kiter with T2 125mm rails and a disruptor. Even harder to catch than the 150mm variant but with lower raw DPS; excellent for picking destroyer fights on your terms.
Double-neut Coercer DPS is awful, but the cap wall is real. With a nos you might steal it, but most likely you lose.
AC TFI with webSkill check
Load Void
With high ground, hug the beacon and land scram + web: you win. On a slide, or if they establish scram-kite range, you are probably dead.
AC TFI without webFavoured
Load Void
Approach, F1, orbit 500.
Cormorant Navy dual MASBUnfavoured
Load Null
Straight stat check: you lose if they rep well. Scram-kite with Null; if they swap to Null, ram back in on a Void reload.
Cormorant Navy bufferFavoured
Load Null
Stat check in your favour. Scram-kite with Null.
Blaster CatNI mirrorSkill check
Load Null
Scram-kite: they likely have Void loaded. Force a reload, or bait Null and ram on Void.
10MN rail CatNICoinflip
Load Void
Approach, F1, heat prop. If it turns bad, burn opposite: they struggle to keep point.
Matchups · 10MN rail
Web-kiter at 10-15 km.
Coercer Navy brawl pulseFavoured
Stay out of Conflag and neut range; hold Antimatter range. Stat-check win: they cannot hold you, so leave anytime.
Coercer Navy double neutFavoured
Get out of neut range immediately.
Beam / locus pulse CoercerUnfavoured
Very bad. Punching a beam Coercer at 20 km gets you deleted.
AC TFI with webSkill check
Heat AB and pray they are mediocre: otherwise you get munched. With high ground, make them crawl into Hail range as long as possible.
AC TFI without webFavoured
Range control vs a close-range weapon: you are fine.
5MN arty TFIFavoured
Stat-check win, but you will not hold them: agility gap.
1MN dual-web arty TFIDisengage
Align out and warp.
Blaster CatNIUnfavoured
They run you down. Heat prop and pray; with high ground, make them crawl to you first.
10MN rail CatNI mirrorCoinflip
Load Antimatter
Neither holds the other well. Ram with Antimatter: heat, skills, and drugs decide it.
Dual MASB CormFavoured
Range control: easy win.
Buffer CormFavoured
Same as blaster CatNI but easier: slower, less EHP.
Amarr Destroyer · CoercerNI
Coercer Navy Issue
Peak laser DPS and neut pressure: held back by two mids and slow speed.
Ship bonuses (per skill level)
7.5%Ship armor hitpoints
7.5%Small Energy Turret damage
10% reductionSmall Energy Turret activation cost
10% reductionEnergy Neutralizer activation cost
10%Energy Neutralizer strength
Role bonus
50% bonus to Small Energy Turret optimal range and falloff
Overview
Massive tank bonus, best-in-class small lasers, and a huge neut bonus: almost the peak destroyer. Two mids, second-slowest speed in class (Cormorant is slower), and an armor-bonus hull mean you usually lose range control in brawls. You win blaster fights with neuts and kiters with Scorch projection.
Dual-neut brawl
The main brawl fork: drop a gun for double neut or not. Double neut trades DPS and projection for cap warfare: with hull bonus, two neuts drain like three unbonused smalls and cap out most destroyers in a couple of heated cycles.
Do not cap yourself: turn off one neut after 2-3 heated cycles.
Neut range is short: hug at 2-3 km. If they escape neut range and you are on Scorch, you are probably losing the DPS race.
MWD + undersized pulses is cap-tight; Scorch no longer covers point range: kiters hurt you.
No-prop + locus pushes Scorch to point range: stat-checks arty TFI and kiting frigates, but kiters slide on you freely.
Other brawl lines
Single-neut or no-neut brawlers have poor range control and get stat-checked by blaster brawlers without the neut trump card. Scorch projection still makes them harder to kite at point than other brawl destroyers. Keep at least one neut: otherwise an AB + web frigate orbits you to death.
Kiting (pulse, beam, locus)
Pulse kiter: technically weaker at point than beam but Conflag DPS is real. SAAR vs multispectrum coating; bulkhead vs third locus vs polycarbon are the usual rig forks.
Locus pulse: do not punch into a plex to brawl: sit inside and delete entrants at point range.
Beam kiter: better at kiting ranges despite tracking. X-Ray (~20 km), Gamma (~17 km), Multifreq (~13 km) DPS bands. CPU-tight: storyline point, Geno pod, rolled heatsinks, event boosters all help.
Double-web meme
Two webs, no point/scram. Hold 8-9 km off the beacon for tracking. No tracking bonus: if they get under your guns you are in trouble.
Upgrades
Genos / Amulets are the easy win. Mutaplasmids on meta neuts are cheap; spare PG (and CPU on the no-prop fit) helps good rolls.
Example fits
Live [NVY] fittings from the First Edition. Copy or open in the fitting library.
[NVY]
dual-neuts-mwd
Classic dual neut brawler with MWD. Uses the hull neut bonus to drain cap-reliant targets, then grind them down at scram range. Beware kiters and capless guns.
Slow brawler with dual neuts, web, and no prop mod. Trades mobility for more tank and control at scram range; ideal when you expect a straight brawl rather than a chase.
Afterburner pulse brawler for tighter range control without MWD signature penalty. Full dual-pulse rack with a neut for cap warfare in straight scram brawls.
Locus coordinator pulse kiter with SAAR for mid-range pressure. Uses tracking and the hull's neut-adjacent slot layout to fight at pulse falloff while staying mobile.
Beam kiter with tracking enhancer for fighting near falloff. Keeps range with MWD and disruptor while applying steady beam DPS to slower brawlers and other kiters.
Double-web beam fit for catching other kiters and holding them in beam range. A niche meme build that punishes pilots who assume every Coercer is a neut brawler.
50% bonus to Small Projectile Turret optimal range and falloff
Overview
Worst navy destroyer on paper in many 1v1 charts: most loved in the cockpit anyway. Minmatar roleplay, 280 mm alpha dopamine, or MWD sig-reduction for manual piloting: pick your poison. Excellent for punching up and down; underwhelming in pure destroyer mirrors.
280 mm artillery kiter
The default TFI. 280s are hard to fit but projection wins kiting matchups. You lose to 10MN rail CatNI and beam/pulse CoercerNI on chart: but you are MUCH faster. Disengage losing fights; slide on brawlers with a reasonable (not guaranteed) scram escape.
PG problem: 3 lows + 2 mids + compact MWD needs 0.9 PG you do not have: ACR rig or overdrive/nano in lows.
TD instead of web helps vs CoercerNI and CatNI (Genos + Pyfa). Sig bonus helps orbit + web.
Autocannon brawl
Shield AC: higher DPS, common, often worse: loses range control vs CatNI and CormNI; AB + web frigates orbit you unless you run a small neut.
Armor AC: scram-kite vs blaster-heavy hulls. Both variants: open by kiting, commit to brawl range only when ready.
Dual-web, no point
Third mid fits AB: punch most brawlers. Stat-checks CatNI and CormNI variants; loses to most CoercerNI except dual-neut. No point: they warp. Keep at range 8500, F1, chill.
Example fits
Live [NVY] fittings from the First Edition. Copy or open in the fitting library.
[NVY]
280mm-acr
Standard 280mm artillery kiter with collision accelerator for alpha and range control. Excellent for fighting on your terms; if you get tackled, you die.
Simpler overdrive artillery kiter with more speed and less alpha than the ACR variant. Good entry 280mm fit for pilots learning Thrasher Fleet Issue kiting.
Armor autocannon brawler with a rocket launcher for close-range brawling. Scram, web, and MWD into range then tear down other destroyers with AC alpha.
Shield autocannon brawler with a neut for cap-dependent targets at scram range. More speed and buffer than the armor AC variant; trades some EHP for mobility.
Dual-web afterburner arty fit for catching kiters and controlling range at artillery optimal. A meme build that turns the tables on other 280mm kiters who rely on keeping you at range.
Stat-check loss: they outrun your tracking abuse and out-EHP/out-DPS you. Dip when it is over.
Pulse / beam kiting CoercerNIUnfavoured
Load Fusion
Web + transversal is your only shot. Punching a setup kiter: heat away and leave.
Brawling CoercerNISkill check
Load Fusion
Focused pulse: orbit at point edge: they usually force you out. Dual light: dead past 17 km: keep moving.
CormNIFavoured
Load EMP
Little they can do sliding in. Even scrammed, 280 alpha + web often kills active tank.
280 mm TFI mirrorCoinflip
Load Plasma
Heat everything: hit quality decides it.
Matchups · Shield ACs
Excluding kiting fits.
General 1v1Unfavoured
Terrible solo fit: heat, F1, pray. High ground: Barrage-kite CatNI/CormNI, then Hail commit (never kite a CoercerNI). Reliable win: other TFIs: ammo coinflip.
Matchups · Armour ACs
Excluding kiting fits.
Blaster CatNISkill check
Load Hail
Stressful: they close to Void. Scram around 8 km; on slide start 10 km out and burn as lock lands.
10MN CatNIUnfavoured
Load Hail
Far from beacon vs 10MN = unwinnable (same speed, web both, they out-DPS outside Hail). Intel says 10MN: hug beacon, preload Hail, heat MWD cycle 2 (cycle 1 they are slower). Far start vs 10MN: leave.
CoercerNICoinflip
Load Hail
Keep ~1500 m. Coinflip on their tank spec (exp/kin vs not).
CormNI brawlUnfavoured
No range control, cannot scram-kite their optimal bonus, cannot Hail through shield: avoid.
AC TFI mirrorCoinflip
Load Hail
Sad coinflip without scout. Hail covers armor; shield opponents kill you anyway (extra gyro + 15% Hail). No web on them: align, heat web, pray scram drops before you pop.
Caldari Destroyer · CormNI
Cormorant Navy Issue
Slow and narrow: but at brawl range it stat-checks most of the class.
Ship bonuses (per skill level)
5%Small Hybrid Turret damage
10%Small Hybrid Turret optimal range
10%Shield Booster amount
Role bonus
50% bonus to Small Hybrid Turret optimal range and falloff
Overview
Opposite of the TFI: often the most disliked navy destroyer. Too slow to kite at point; built for sniping in theory. Regular Cormorant is cheaper (~20M) for pure snipe. Shield-booster bonus is slot-inefficient: one MASB is not enough tank; MSB needs cap inject and eats mids.
Redeeming quality: brawl range. Tank + damage stack high; optimal bonus resists scram-kite. AB over MWD for range control and double-MASb fitting room.
Dual MASB brawl
Full compact + neutrons or full T2 + ions. Standard blue pill (or improved) + hardshell. MG-Crystal pod is cost-effective; skip abyssals: tight fit, MASBs are hard to roll.
Buffer surprise
Ignore active-tank bonus; single MSE. Worse CatNI on paper: you play the surprise MWD + web angle. Snake pod + speed drug scrams kiters who thought you were slow. Lose brawl supremacy vs dual MASB lines; bling MSE required: do not cheap out.
10MN / 75 mm bling
Anomaly on paper, strong in practice: 10MN + scram + active tank + 75 mm rails. Antimatter close, Iridium for kiters. Stat-check at scram; range control vs 5MN/web brawlers.
Terrible agility: 10MN range control is hard; easy to overshoot.
100M+ ISK mostly Pithum C-type MSB.
Blue pill, improved blue pill, hardshell, crystal pod: face-tanks most destroyers 1v1; blobbed once recognized.
Example fits
Live [NVY] fittings from the First Edition. Copy or open in the fitting library.
[NVY]
dual-masb-neutrons
Dual MASB neutron brawler with burst shield tank for winning scram brawls. Pulses XLASB charges and overheats to outlast other destroyers at close range.
Dual MASB ion blaster brawler with slightly longer reach than the neutron variant. Same burst-shield brawl concept for pilots who prefer ion range and tracking tradeoffs.
Surprise MWD buffer fit with a Republic Fleet medium shield extender. Looks like a kiter until you scram and brawl with strong shield buffer and blaster DPS.
10MN rail scram-kite with cap booster and shield booster for sustained mid-range pressure. Uses 75mm rails to control range while staying under scram and applying steady DPS.